  |
|
The 1GM10 Exhaust Elbow
I dedcided to do a page on this as its an awkward this to check in situ - and if you do work on it like that - a few things to watch out for. I have cleaned it out several times with the head on - but take great care. The elbow itself - is bolted on to the head and attaches to the wet exhaust. If you ave not had one off - take a look at it outside and it seems just a tube with a water entry. In some ways that is right - but, inside the top half is another tube - smaller than outside. This tube takes the exhaust gases halfway down the unit. The small inlet tube for the water - this only connects to the outer tube, and the water and exhaust gases are separate until halfway down the tube, where they join and enter the 'rubber' section of the exhaust. Exhaust in the middle - water on the outside - then all together by the time it meets the rubber. Where the flange bolts on is very vulnerable - as it here the inner tube is welded to the flange - and the integrity of this weld is critical to stop water leaking from the outer tube straight into the exhaust port. You may get away with it for a while - as the exhaust gases will blow it out - but then you have salt - hot - wet gases, which is a potion no metal is going to withstand for long. Major amounts of water entering the exhaust port are going to cause severe and expensive engine problems. From my experience with the old one - which had a small leak (and was a stainless one ) and the condition of the new one after three years on and about 60 hrs or so running - check it every season minimum ! When you check it be brutal. Get your 'dentists' hat on and really dig around the 'exit collar' weld. Thoroughly clean and wire brush it with caustic or oven cleaner or the like. You will see small 'dissolved pimples' - you just hope they are light ! lock the small inlet pipe - then fill between the two pipes, flange downwards. Check for water leaking. Certainly the old one looked like it was suffering from corrosion from electrolosis where it failed ( I will get some pics of it - I still have it . I was going to try to get it welded as a spare. ) Even my new elbow - although its sound at the weld, has areas down the tube where there are 'dissovled' pimples showing already. I have read a report that suggests these elbows are 'not fit for purpose' ! - the grade of stainless was too low. Not easy things to weld up - but if you catch it when its just a pimple gone through - maybe you have a better chance of a repair. Be sure of any repair you do though ! Thay are pricey new - cheapest I've found at present is on the Marine Power site @ £156 inc vat plus a free gasket ! A US site sells new 304 stainless ones for about 110 dollars free shipping - paypal - apparently quick and easy to order and buy. They look good - but so does a new Yanmar ( and they are stainless ) Stainless will still 'pickle' - into pock marks very quickly. My new one - put in maybe 4 yeras ago is visibly marked already. doubt it will last another three ? I have just melted down an old bit of zinc to make a small oval thin anode - I'm going to drill the end of the tube, as it joins the hose - and screw it on with csk head machine screw. Everything about it looks to me like electrolysis - so a small anode in there cant go amiss. It downlhill to the pipe if it falls off. Actually - the exhaust port is more of a problem than the elbow. It tends to soot up and bock, and is a very awkward thing to clean out in situ. There also have been various online tales of discovering 'holes' in the wall of the exhaust port in the head casting. My old problem when trying to clean it out was - whats carbon and whats wall - it hard stuff. Now I have it off on the bench - I thought a few pics and measurements might be of use.
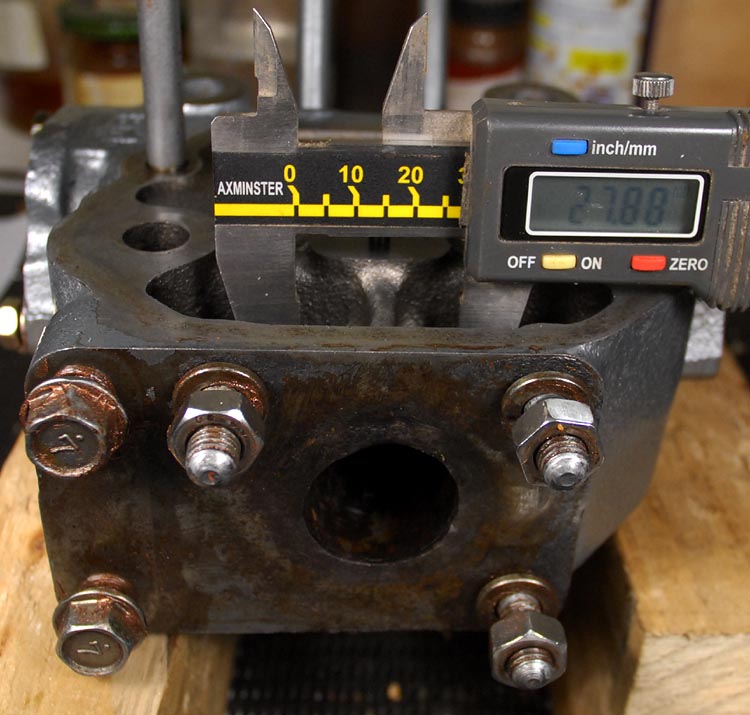
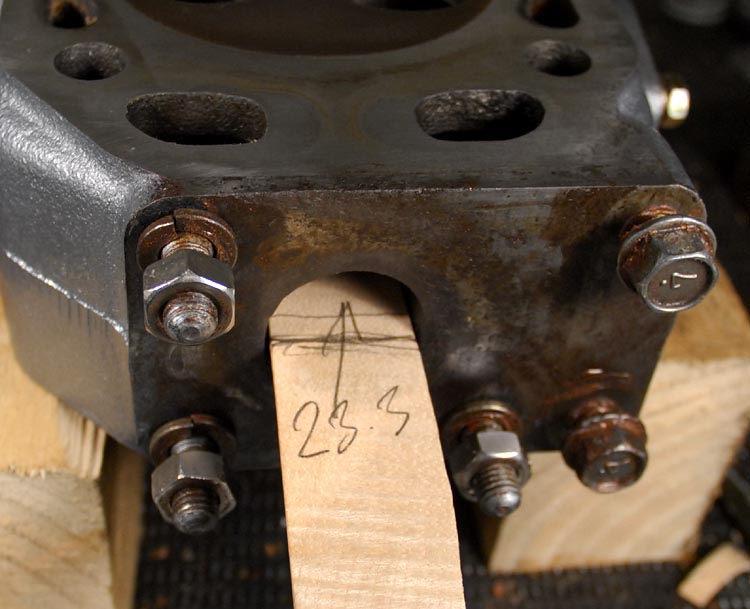
The head casting - right way up, port cleaned out roughly to bare metal all round. The total thickness of the casting is 28mm . From where you see here, its parallel down to the block. So under the port exit hole is solid metal. Above - is cast, with an extra flange showing between the calipers. As shown above - there is not much there if you starting to get corrosion. Bear in mind the casting is that thickness all the way down - but, as below, the inner measure at the centre of the hole, centre flange, is 23.5 mm. So the very centre of each side is just 2mm thick. I measured the top of the port to the top casting - either side of the top flange - and its approx 4mm all around the top, plus of course the flange in the middle. So top and bottom are quite meaty. The dangerous spots are dead centre, either side !
The bottom of the port - block face. It all solid metal here right through. Thats my width at centre of those tappet chamber castings. Very little at the dead centre. I have not ground anything away - just hit bare metal with a small dremel 80 grit sanding wheel. I can see why they rot through. Unless you have severly neglected this elbow over many years, you are unlikely to have perforated the wall. It would seem to be an easy thing to weld - as the backside is clean metal casting, with fair access. With no leaking elbow - carbon is more your problem. Cleaning in situ - be carefull. When I took the head off eventually, I had cleaned out the port a bit before hand but had not run the engine at all. When I stripped the valves out - all sorts of carbon crap had trapped itself in the exhaust valve seat. Ok - it would have been blasted out on starting no doubt - but it got in there. When I have tried to do it - I make a small foam plug, with a strong cord pulled through the middle. Grease it, and push it into the exhaust port, right in, so you need the cord to pull it out. The you can try to scrape away at the carbon - which is usually around the outer part of the port exit. Sometimes in the past I have hardly been able to get my index finger in this port ! Take a look at the true size of it. Do not attack it with anything thats capable of remvoing metal - other than a surface scratch. A dremel with rubber sanding disc, sort of 80 grit stuff is innocent ennough to not eat into metal, but harsh enough to take off carbon. It also just creates dust - whereas chpping away at carbon makes for 'bits'. Either way its an awkward messy job. It was awkward and messy with it on a good bench in very good light ! Just bear in mind what I have shown above. Bottom edge, solid - top, 4mm or so all round - middles either side, delicate ! Hole sized cleaned out - approx 25mm at flange, 23mm mid tappet tubes - max. Castings may vary of course - so do not believe a word I say ! Geoff - Jan 2014. Put text in individual divs |