 |
 |
|
| Restoring Lena-Contact-Sailing Home-Sailing Logs-Uphill photo Tour | ||
| The Suzuki DT2 - the Final 'Non-Bodge' !
Well - its a good day, when someone peeps their horn, points at the passenger seat - on which sits the head and crankcase shell of a Suzuki DT2 ! At last - my water jacket bodges are over - so long as my power head will dismantle ok. Flywheel DT2 - and DT2.2 ( afaik ) puller can be made easily. The three top holes are M6. Get a flat bit of plate - drill three holes to match, one in the middle, about M8. Stick three machine screws in the holes, through the plate, with a nut above - another bolt, M8 through the middle, with the end ground off a little to a rough blunt point - so it sits in the centre of the crankshaft dimple, and with a nut below the plate. Hold the lower nut - tighten the bolt head. Sharply tap the puller - tighten a bit more - tap, and bingo, it pops right off. Either carefully measure the three holes - or just make the holes about 7mm to cope with being a bit out. Electrical - Early model DT2.
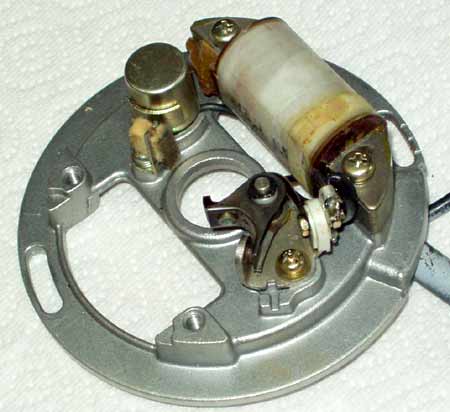
Just for the record - this is whats underneath the flywheel. Just in case you have to grope through the holes in the flywheel to get at any of this stuff. This is the early model set up. I don't have a manual that covers this early - so have checked with a cig paper as to when the point just open, before I dismantled. The ring here, with the slots in the base - is fixed with the fixing nut centered between the three lines, on the right. That presumeably fixes the basic timing. I measured the contact points gap on mine at 0.4mm. You cannot adjust the ring through the flywheel slots - as you cannot reach the screw under the coil ? So I don't really see how the basic timing can be adjusted once the flywheel is back on ? How all this gubbins produces electricity to fire the coil is beyond me - but I know what points, condensor and coil are. They are what Real Cars used to have, ones I could fiddle with ! Crankcase So - it all came apart nicely - and inside it was even easier, as these things are just roller bearings on the mains - with two oil seals either side.
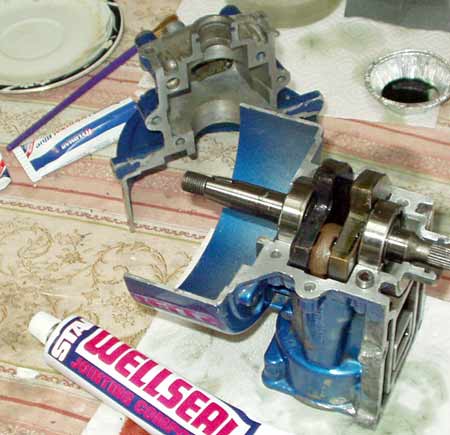
The whole lump pulls out wih the piston. Seemed in good shape really - piston in good condition. Took the rings off and cleaned the grooves out. This is the older, hence the blue livery, replacement engine case. Identical, except for a minor differnece at the base of the reed valve - where the casting on mine has a small lip. My reed valve seemed much more airtight than the other - just sucking through it. So swaped the spring plates over - and gently lapped up the alloy face it sits on with fine wet and dry stuck to a small block. This made a huge difference. The casings are machined as a matched set so I couldn't really use my other half with the newer reed valve in it. Case sealant Suzuki cite Suzuki bond no 4 - whatever that is. I spent half the night on the internet delving into case sealants for two strokes. Basically, although several auto shops told me blue silcone rtv ( room temperature vulcanisation ) stuff was ok - it apparently does not like petrol. There are some very expensive racing compounds - like £27 a tube ! After what I'd read, for a close metal to metal joint, thats subject to petrol, Red Hermetite, semi hardening - Blue Hylomar ( this is not a silicone blue, but a polyeurythane semi hardening stuff ) - much respected, and sold in Halfords - after I ran around half of Bristol trying elsewhere - and Wellseal - shown above. I just happened to be passing an old looking car parts place - so popped in, and it was a 'real' engine rebuilding shop, with a couple of old guys in there, almost as old as me ! This is what you want, he says - and after a check online, he's right - its very sought after stuff. Even Californians and Aussies are desperately trying to get their hands on the stuff - apparently it was used on Merlin engines ! So - which ? Not sure yet as to use the Wellseal or the Hylomar. The latter is actually a reassuringly stiff, tight blue layer, once on a test bit of stuff, and really 'looks' like it going to seal the thing up. You can let it go off for as long as you like before closing the joint. The Wellseal is quite nice to brush on - quite fluid, then goes really sticky as it tacks off. It says leave it 5 mins, but it was still tacky on a test bit of card after an hour or so. The shop man said to just put a coat on one face and close up -but the tube said both, and leave for five mins - you can't win really ! The crank runs really close - like 2mm from the casing, and very close to the reed valve, so I'm a bit concerned it might pick up a bit internally and get down on the valve seat. Essentially, that reed valve needs to be really clean - though maybe wise to dose it with some two stroke oil before closing up - then anything would be less likely to settle on it and stick there. It's not a Merlin engine after all - its a twenty year old, 2 hp 2 stroke ! But its why I might go with the Hylomar - its a nice stiff coating. Hopefully - it will all be ok. The only unknown, really, is the old bore. I'm not into micrometers and stuff, but it looks pretty good - and I know enough to deglaze it first. Then run the thing on 30:1 for five hours run in. The head and the bore end are true enough - just with a steel rule and an 002" feeler gauge. We shall see - if not its new Honda time - and £400 quid poorer. Geoff - Jan 08 |
||